
|
|
|
16 Days of Robots Battlebots Season 5 taping will be taking place May 25-27, 2002. I will be driving from Vancouver to San Francisco, a 15-ish hour trip on the 22nd to check in on the 23rd. This is a day-by-day account of how I spent the final 2 weeks + 2 days in preparation for the competition. Preface The upgrades for each season are directly a result of how I lost the season previously. If you’ve seen the Hazard VS Complete Control match before (if you haven’t http://www.automatum.com/sa/ccvshazard.wmv), you’ll realize that I lost due to have my robot smashed mercilessly. To overcome this, I am trying to build this robot as tough as possible. Weight is being reduced in non-critical areas and being re-applied in structural and armour improvements. I feel that this is going to be my strongest robot yet, and certainly the best version of Complete Control to date. Other improvements are a 50% speed increase, from 7 mph to 11 mph and an increase in battery capacity through the use of 3600mAh batteries from http://www.battlepack.com I am normally a last minute kind of person, but much of the 4th revision of Complete Control has taken place already, the new wheel and sprocket set-up was made months ago, and all the ˝” 6061 aluminum structural pieces were made at the end of April as the CNC router which I produced them on was going back to its owner for a few months. Being forced to produce at a deadline earlier than “right before leaving” keeps me on track it seems. Along with that, much of the hard to build components (fork assembly, weapon and drive train gearboxes), will be reused from the last version of Complete Control, so this build isn’t as involved as last year. Before anything could be built though, the robot was 3D modelled in SolidWorks. This allows me to make sure that everything will fit before I go and translate it into metal. While this is a great way to design a robot, any errors made in the 3D model can easily propagate to the physical robot 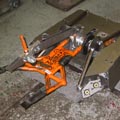 Monday May 6 Got to the shop at 9:30am. Machined the y-bracket to hold the end effector on the upper grabber arm out of a block of aluminum. After lunch I picked up waterjet cut 2mm 6-4 titanium from Aquashear ($230CDN) in North Van, trying to work out a sponsorship deal with them. Waterjet cutting as the name suggests uses an ultra high powered jet of water and abrasives to cut material. It is the only sensible way of getting large sheets of titanium accurately cut. I managed to show up just in time to see the cutting being finished. The material sits on a bed flooded with brown ultra muddy water with the waterjet nozzle producing a raging torrent of bubbling filty water wherever it is cutting. The Ti also gives off sparks from the cutting even underwater. They only take cash and cheque, nearly crash my car going to get money for them. The parts look good, but I noticed that some of the holes in the baseplate are oversized, due to my carelessness when drawing them (I neglected to dimension them properly). Once the titanium is back in the shop, the basic shape of the robot comes together very quickly, as most of the structural parts have already been made. This is basically what it looked like after an hour of bolting things together 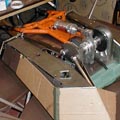 As much as possible is assembled, and other than a new aluminum clevis for the grabber arm cylinder no more fabrication is done today. The corners of this piece may be rounded if I end up having enough time.  The machined y-bracket and the grabber arm end-effector. 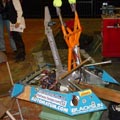 A shot of the rear of the robot. The whole back assembly is plated in with titanium on 3 sides, which should provide a huge increase in strength VS last year, where there was only plastic playing this role. 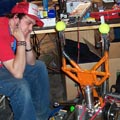 A detail of the isolator, made by Barry Controls -- cost to me $18US each. These fail safe, as in the event that the rubber is destroyed they do not allow for whatever is bolted to them to come off. Thicker 3mm titanium plate will eventually be bolted to the outside of these isolators to form the rear wedge of the robot. Each isolator is held on by 4 8-32 machine screws and Nylok nuts.  Front corner assembly using the same isolators. The front corners are designed on an angle to try to deflect hits from my opponents. We’ll see how well this works soon enough. 3mm Ti plate will also be bolted on here for the outer armour layer.  The new grabber arm pivot, made from a solid piece of 7475 aluminum. This was a trick to machine as it was 2” thick to begin with, and much of it was done on the router table, that can only machine ~7/8” deep. Required a lot of set up. I probably spent a total of 8 hours machining this one piece. You can also see the custom nylon bushings (white) which I machined to ride on the main shaft. The outer retaining collars were also done on the CNC router table. “Automatum Technologies” (my robot building organization name) was machined around the rings using a ball-nosed 1/16” endmill.  I ended up getting home at 11pm, approximately 13 hours after getting there in the morning. Tuesday May 7 Got in to the shop around 10:00 am. Yesterday while I was working on the robot, I had a local machine shop bore and key the new sprockets for the drive gearboxes, total cost of $100CDN. I would have done it myself, but we don’t have a broach (required for making keyways), and I don’t trust our lathe to produce concentric bores. Money well spent. First to do today was to turn down 2 of the sprockets so that their hubs were only .25” to make up a double-single sprocket. For some reason #25 double-single sprockets don’t exist, so I had to make my own. Here’s on of the finished sprocket pairs mounted on the gearbox.  Picked up my new #40 36 tooth sprocket for the lifter arm (Hazard destroyed my old one) as well as some new bushings for the arm axle and some chain master links. Another $60CDN bill at Raeside Equipment.  Installed the rubber Energy Suspension bump stops to the grabber arm end. The other holes are for other placement options. The whole new grabber arm is designed to be compliant and to adapt to different shapes better than the old system.  Installying greasy #40 chain. Looks like I will need an offset-links to make this come together.  The installed right hand drive gearbox. These gearboxes use dual Astroflight Cobalt 40 electric R/C airplane motors for power. Their maximum output is 1.5hp each, giving the robot a total of 6hp in maximum drive power. The chain is #25, purchased from Raeside. 10’ = $88CDN. A critical error was discovered at this point though. The black brush holders (at the ends of the motors) as it stands now, hang into the battery compartment (the empty space to the left of the motors)  Overall shot of the robot as it stands. I managed to get the arm installed, and it is really starting to look familiar again.  A shot from the back.  Left the shop at 12:50am, giving today a total of well over 14 hours of robot madness. Wednesday May 8 Not a terribly productive day. Real paid work got in the way of building, but that’s not necessarily a bad thing. Finished the right hand side of the arm support. This involved cutting ˝” alminum plate on the table saw to size and drilling and tapping 9 holes in each plate. Once those were built, a ˝” Lexan mount was fabricated for attaching the feedback potentiometer for the lifter arm circuitry. I use a PIC microcontroller based board to turn the arm into a giant servo, so I have position control of the forks via the throttle channel of my transmitter. Full up on the transmitter stick means full back on the forks and full down makes the fork tips touch the ground. The system works really well, and makes it so that I can’t overshoot my limits and damage the robot.  I picked up some offset links for the #40 chain, and installed that. PRO TIP: if you ever work with chain, do yourself a favour and buy a chain breaker. It is the best $20 tool I have ever bought, coming a close second is my gear puller. Both these tools make jobs that are otherwise difficult, awkward and potentially damaging to parts, a breeze.  Here’s a detail of the 2 different chain sizes I use on Complete Control. The drive train chains have actually been reduced from #35 (3/8” pitch) which I used last year to #25 (1/4” pitch). The reasoning behind this is multifaceted. Firstly to save weight on chain and chain related components by making things smaller, and secondly because it is easier to break. Why would I want it to break? Well, when Hazard tweaked the frame of my robot last season, the drive train jammed causing $180 in motor damage. With the smaller chains, if the robot takes substantial structural damage, hopefully the chains will be a mechanical fuse of sorts and break before the motors do. Anyone who thinks they are undersized will be reminded that n+1 time heavyweight champion Biohazard (a 220lb robot) has used #25 for its drive train forever.  What was keeping me from doing more… Our shop has been contracted to build a rocket/chainsaw powered bicycle for a Lee jeans commercial. Here’s what we were given as artwork.  Here’s where the bike was when I left last night. I haven’t done work on it myself, but am in more of a consulting role, deciding how things are to be done, but letting other people do them.  A final parting shot of the bottom of the robot. I didn’t have the right bolts (1/4-20 ľ” button head) until today, so I had to wait until now to fill in all the holes.  I’m leaving for Calgary on Friday, with a non-functional, but mostly complete robot. On Thursday I will machine up some chain tensioners for the drive chain, and probably finalize a t-shirt design, as well as put together my “lecture” for the Western Canadian Robot Games (http://www.robotgames.com). Thursday May 9 Well, I didn’t manage to get anything built today, but I did finish designing and ordering my Battlebots Season 5 t-shirts, and I am pretty excited about them. This is the design I ended up going with. If there are any spelling errors, don’t bother telling me because it is too late. Here’s the black image, but it will also be made in navy blue. The image will be on the front of the shirt only and be about 8x5 inches. I will be selling these at the event in San Francisco and through my website afterwards if you are interested in buying one.  I also prepared my lecture for the Western Canadian Robot Games, which I will be attending on Saturday in Calgary. I’m even on the poster  I will have lots of battlebots related crap with me including the new Complete Control, my Antweight robot Hoser’d some toys and a bunch of other things. Should be fun. My 10 hour drive starts in under 5 hours though, so I am going to sleep. Friday May 10 My girlfriend and I awoke at 5:00am, got on the road at 6:20, arrived in Calgary 11 hours later, got to motel, watched tv, ate at Taco Bell, drank some beer and went to sleep. Saturday May 11 Today I took part in the Western Canadian Robot Games that were held at SAIT in Calgary. The competition involved mostly sumo robots, both R/C and autonomous. My display consisted of Complete Control, Hoser’d and a bunch of other crap, including my toys, a couple of magazines I was featured in and some smashed up parts. Answered a lot of questions and people seemed to be pretty interested in my stuff.  Another robot, Epitaph built by Calgary local Russell Jones, was on display too. This thing was badass. 340lb superheavy weight with a hydraulic grab-and-stab mechanism. It is still being developed though and won’t compete until next November.   My CNC cut lowrider-car-club-esque corporate logo displayed on the back of Complete Control.  An interesting 6 legged walking machine in the midst of development. It was pretty cool, but it was all hand crafted and the guy had been working on it for 2 years now. I felt bad that he spent so much time on it simply because he didn’t have tools to make things go quicker. So goes the life of a hobbyist I suppose.  I managed to put together a 45 minute lecture about fighting robots that was attended by ~100 people or so, and went off pretty well. SA goon Omega Dragon made an appearance at the event too – thanks for coming! After the event the owner of Solarbotics (http://www.solarbotics.com) held a bbq at his home/business, which was a good place eat and drink and talk about robots with a diverse range of people. Most of the people there were BEAM robot types, but my non-autonomous robot building self was accepted and we had a good time. Sunday May 12 After sleeping in until 9:30 (8:30PST), back on the road again. Here’s what it looks like to drive out of Calgary towards the Rocky Mountains  This is in fact the same train looping over itself through a spiral tunnel. I just stoped to use a roadside bathroom, and was the recipient of good timing.  Disaster Strikes! My car (1992 Nissan NX2000), is the sorry victim of 5th gear pop-out. The 5th gear synchro was poorly designed and when it wears out, the shifter pops out into neutral upon accelerating in 5th. This is a common problem with the early Nissan SR20DE cars and was fixed in 1994. I was hoping that it would never happen to me, but it did, and it has become one more thing to do before I go to SF in just over a week. Not only is it inconveniencing, but also I’m looking at a $1000USD repair bill (3 zeros). For a temporary fix so that we could nurse the car home without having only 4 gears, my girlfriend strapped the shifter to the cup holder with her belt. This was a hassle as the belt had to come off in every little shit hole town.  What’s the interior Canada without wildlife? Just mountains and trees mostly. Saw some deer, a little bear running across the road and these mountain goats. They decided to block traffic.  I also saw a real life hobo! With a bag on a stick and everything!  Got home at 9:30pm and now it’s back to work on the machine. Time is running short – 9 days left to go. Monday May 13 Mostly a recovery day for me. I spend the morning trying to figure out what to do about my car. It was disappointing to say the least. Looking at $1000 in labour and $400 in parts. I have decided to rig up a semi-permanent bungee cord to replace the belt and worry about my car later. I will probably just replace the transmission all together. I also did some parts shopping, and went into work and hung out while we waited for clients to show up to tell us what was going on. I think I went home early, as I was burned out from the drive. Tuesday May 14 Our shop is getting busy. I came into work to find a couple of major (30-60 hour) prop builds on tap, both of which I would be responsible for at least 50% of. Major shitty timing. One is a false external USB computer device that reads both a Iomega Clik (remember those?) disc and a business card sized crystal “mystery memory card”. The mystery card will load into a powered cd-rom like tray. No problem. This build should go smoothly as there isn’t anything there that can’t be done with the tech that we have around the shop. The second job is to build a false gas pump display. They need it as they are filming in Canada, a pump reading “litres” just won’t be convincing as an american gas station pump. 1” tall 7 segment backlit LCDs. This is where it gets tricky. You can’t just buy these things at your local electronics shop. Major shopping involved. Also some tricky logic, getting a 8 bit PIC processor to count to 999.999 while also counting to 1.XX*999.999. It looked like about a 60 hour job, and it was to due on Friday. As soon as I heard the news, I started writing code for the microcontroller. 4 hours into it, I had most of the logic worked out. Then I was told that “we don’t have the job yet – we just need to quote on it”. Ugh. We came up with a quote for $5000 for it, or approximately 60 hours of labour +$1500 in materials. Once I stopped work on this, I got the run down on the computer device, and worked on that for the remainder of the day. Wednesday May 15 Major building prop day for me. Spent the whole day machining and fabricating for the USB device. Here’s some pictures of it and the shop. For some reason our prop building studio is becoming a motorcycle garage. I think at last count there was ~12 vintage motorbikes in the yard and inside the shop.  The USB Device in early stages. The top plate is from a hard drive, as is the internal board. The tray is driven through a rack and pinion system with a hobby servo.  Detail of the tray. Other than the gear rack, I manually machined it from a solid piece of .875” thick aluminum.  The underside of the tray.  $350 worth of white surface mount LEDs. Bling bling!  After work I came home and finished the designing of all the armour for Complete Control. 1 small problem – I don’t have enough titanium for all of it. Looks like I will be heading to Boeing Surplus again. Thursday May 15 Today, I dropped off my remaining titanium at the pressure cutters (cuts materials with a high pressure water/abrasive stream) and then I spent the day driving to and from Boeing Surplus in Kent, Washington (10 miles south of Seattle), as I ran out of titanium. If you live in the Seattle area, you should check it out some time. They have tons of crazy shit and it is reasonably priced. On the way down I looked in my rear-view mirror to discover this  I gave the mullet’d driver the thumbs up as his chrome fender flared beast roared by me and into the HOV lane (he was alone) with a resounding “BL-A-A-A-A-AT”.  After dropping $570 at Boeing, the rest of the day was spent sitting in traffic in and around the Seattle area. I ended up driving around for 11 hours today – the same as driving to Calgary, but by myself. Once I got home, I finished up the design of the final titanium parts. Friday May 16 SHOPPING. My VISA was on fire by noon. Since this weekend has a holiday-Monday (Victoria day), I need to buy everything I’d possibly need for finishing the robot today. Before leaving the house I ordered some super powerful magnets for balance assits and wedge hold down. Pretty much a super last minute idea – don’t know if it will work how I want, but worth a shot anyways. Places I stopped: Aquashear (pressure cutters – to drop off the new Titanium) Air Liquide (welding supply store – picked TIG welding rod) Fairview Fittings (custom Teflon/stainless steel hose, pressure gauges) Peerless Engineering (pneumatic valves, hose and fittings) Home Depot (4 8”x.75” cold chisels) Burnaby Hobbies (Astroflight Zero Loss connectors, wire, servo tape) Arby’s (Roast beef and Cheddar combo w. curly fries and Dr Pepper) RP Electronic (24V cooling fans) Rustan Metals (1.5”x.125” 1018 bar stock) This all took around 7 hours total. Got back to the shop to work on the USB prop for a couple hours, and then we bbq’d steaks and drank beer until around 10pm. Even if we work every single day, Fridays are still Fridays. Projections: USB prop will be finished Saturday. Robot will be nearly complete and running by Monday. Tuesday will be the painting/finishing day. It looks like I will be leaving Wednesday aftenoon now, so that gives me most of Wednesday to pack and get ready to leave. Saturday May 17 Today was supposed to be a MAJOR building day, but it turned into a day of triumphant failures. The USB prop was pretty much finished, but only after spending 4 hours debugging to discover that a PIC C509’s stack is only 2-deep. I finally got the thing together at around 7pm. Here’s a detail of the “Clik” drive slot  That’s it for building props until I get back. The gas pump was thankfully cancelled once they heard how much we needed to do it. Yesterday I picked up the rest of the titanium pieces for the robot, so now it was time to test fit it all.  Everything seems to line up properly, which is a good thing.  The internal corner, where the titanium armour attaches to the support plates.  To make this piece I had to bend the Ti plate about 10 degrees. I thought that this would be trivial, but the procedure ended up bearing a striking resemblance to me trying to debug my code earlier in the day. I simply couldn’t get it hot enough with a propane torch for it to be bendable. So I tried high-heat (MPS) gas – nope. Then both propane and MPS -- nothing. I finally settled on using the tig welder to heat it up to cherry red and bending it over the edge of our welding table. Seems to have worked ok. I just hope it hasn’t embrittled the material or made it significantly weaker.  Sunday May 18 Today is the day that most of the competitors will be checking into the competition in San Francisco. My robot isn’t running yet, but the fact that hundreds of robots are already there and ready to fight make me feel a bit behind. Big day today. Came into work at noon-ish, first I turned up 24 inserts for balljoints that I am making (this will be explained in more detail later). I don’t like having to turn out multiple parts, so this was a hard thing to get around and do. Ended up taking a couple of hours.  The digital readout mill was being occupied with paid work by a co-worker, so I had to find something else to do. You all remember my small robot Hoser’d, right? Well there is going to be an Antweight exhibition tournament during the lunch time this Friday. I signed up for it, even though Hoser’d was broken. I finally got around to fixing it up today. I replaced the stripped 72 pitch aluminum main spinner gear with a 32 pitch brass gear. It went pretty well considering I had to drop 65 grams (the whole robot weighs ~900g) from the brass gear before it went on the robot. Some pretty creative lathe work was involved.  My biggest achievement today was the building of my top-secret weapon, tentatively named “the Crucifier”. It was invented by my friend Danny Haeg, builder of the “Tower of Power” http://www.battlebots.com/meet_the_...file.asp?id=518 He and I refined the design over email, and I’m building it. The piece:  Here’s how it works. Step 1, grab a hold of your opponent using the upper grabbing arm.  Step 2. Drive opponent over to the “pulverizers” (giant stainless steel hammers that are mounted in the corners of the arena) Step 3. Position Crucifier under pulverizer and allow pulverizer to pound the spike (sharpened 8”x.75” chisel) into the opposing robot (in this case an MDF box).  Step 4. Release grabber, leaving a bright orange spike sticking out of the opponent’s robot.  Step 5. If the robot is “invertible” (like Bad Attitude), flip them over and watch them not be able to drive with a spike sticking out of the top of their robot. If the robot is a spinner (like Hazard), watch the spike jam the weapon blade, rendering it useless (the spinner has to be stopped first before the robot is grabbed mind you). If the robot happened to have a critical component (batteries, speed controllers, pneumatic tanks) under the spike, watch it sit in a majorly helpless state. I’m really excited about this thing. If I can get it to work once, it will go down in the annals of fighting robot history, as such a weapon has never been used or even seen before. I also weighed in everything that will be going on the robot and I am STILL 20lbs underweight. This is good news, as I don’t have to worry about drilling a bunch of holes or anything at the last minute to make weight. Also, I can add a bunch more armor and bracing at the last minute (IE day after tomorrow). I am suspicious though, as it seems very low – perhaps my scale is broken (that would suck immensely)  For the last hour and a half that I was in the shop (1:30-3:00am), I built the holding block for my magnets. The main part is made up of Polyethylene, and the bottom skid plate is .2” Teflon. Drilled 30 holes in each piece, 30 countersinks in the Teflon, and tapped the 30 holes in the PE. I was surprised that I managed to pull it off without making any errors that late at night.  It’s 8:00am Monday as I write this, with burning eyes and very sore hands – time to get back to work. I also just got my VISA bill yesterday -- $4000 in the past month. This shit ain’t cheap -- I guess I had better win this time. Monday May 20th Well, I hoped to have the robot running by today, but it didn’t happen. I did get quite a bit done though, and basically have everything sorted out for how the robot will be coming together in the end (yes I didn’t know what I was doing about certain things until now). I have to get back to work on it, so I will keep this update brief. Ph34r my l33t TIG welding skillz. Repaired/strengthened forks. Should I repaint them? My girlfriend says yes, my boss says no.  The most important thing I did was cast up all the urethane balls for my custom ball joint system I am using for bracing on the robot. I will be picking up the aluminum outer parts for the balljoints on Tuesday from my CNC sponsor Pathway Design http://www.pathway-design.com Here’s how these balls are made: I made a mold out of some sort of polyethylene (slippery white plastic). The mold is in 2 halfs, with a half sphere on each side. The inserts (made yesterday), are placed in the mold  The mold is screwed together and clamped, so that the two halves meet up and seat properly.  Using Evergreen 40 urethane, I mix 20 grams part A, 20 grams of part B, 2 grams of “kick-it” accelerator, and some blue dye. I then quickly pour the liquid rubber into the mold (it will start to set up in about 2 minutes, so this has to be done asap).  Now that the rubber is in the mold, it is time for lunch. Since I am a busy guy, I can’t take time to eat more than 1 meal a day (and possibly breakfast) -- Kent’s Kitchen to the rescue! This is a budget Chinese fast food restaurant in china town in Vancouver. Along with the beef tripe and chicken feet they have typical whitey-fied Chinese food that I have a semi-addiction to. The food isn’t great, but 1174g (~2.6 pounds) of food for $4.25 (~$2.75US), is unbeatable. And if you eat this at 3 in the aftenoon you can work until you fall asleep without thinking about food again. Today I had the ususal, sweet and sour pork and fried rice noodle with beef.  Now that lunch is over, the balls can be de-molded.  Here’s my collection.  My girlfriend stopped by to bring me coffee and take a picture of me grinding some titanium  Other stuff I finished: I mounted up the pneumatics set up – this took a really long time to get everything to fit properly.  I also bend the rear wedge titanium, and started fitting the thick rubber sheet to it. I started doing this when I got my magical second wind at 2:30am.  A self portrait as I leave the shop at 4:00am.  Enough writing -- I have shit to do. |
 |
|
© Derek Young 1997-2005 |